Configuring Eduroam

We took the information from http://accounts.hfg-karlsruhe.de after login in.

Apple (macOS, iOS)

You can download this configuration file that will do that for you.

You will need to enter your username and password twice (you will configure both eduroam and eduroam-hfg).

Windows 10 & 11

Windows installation is a bit tricky, but we have this step-by-step guide.

Open the Windows Settings (Einstellungen) of your Computer.

Screenshot of Windows Settings in German, with a profile photo, a search bar and then a menu with system, devices, telephone, networks and internet (this one is selected in a red rectangle) personalization, apps and accounts, all of them preceded by an icon

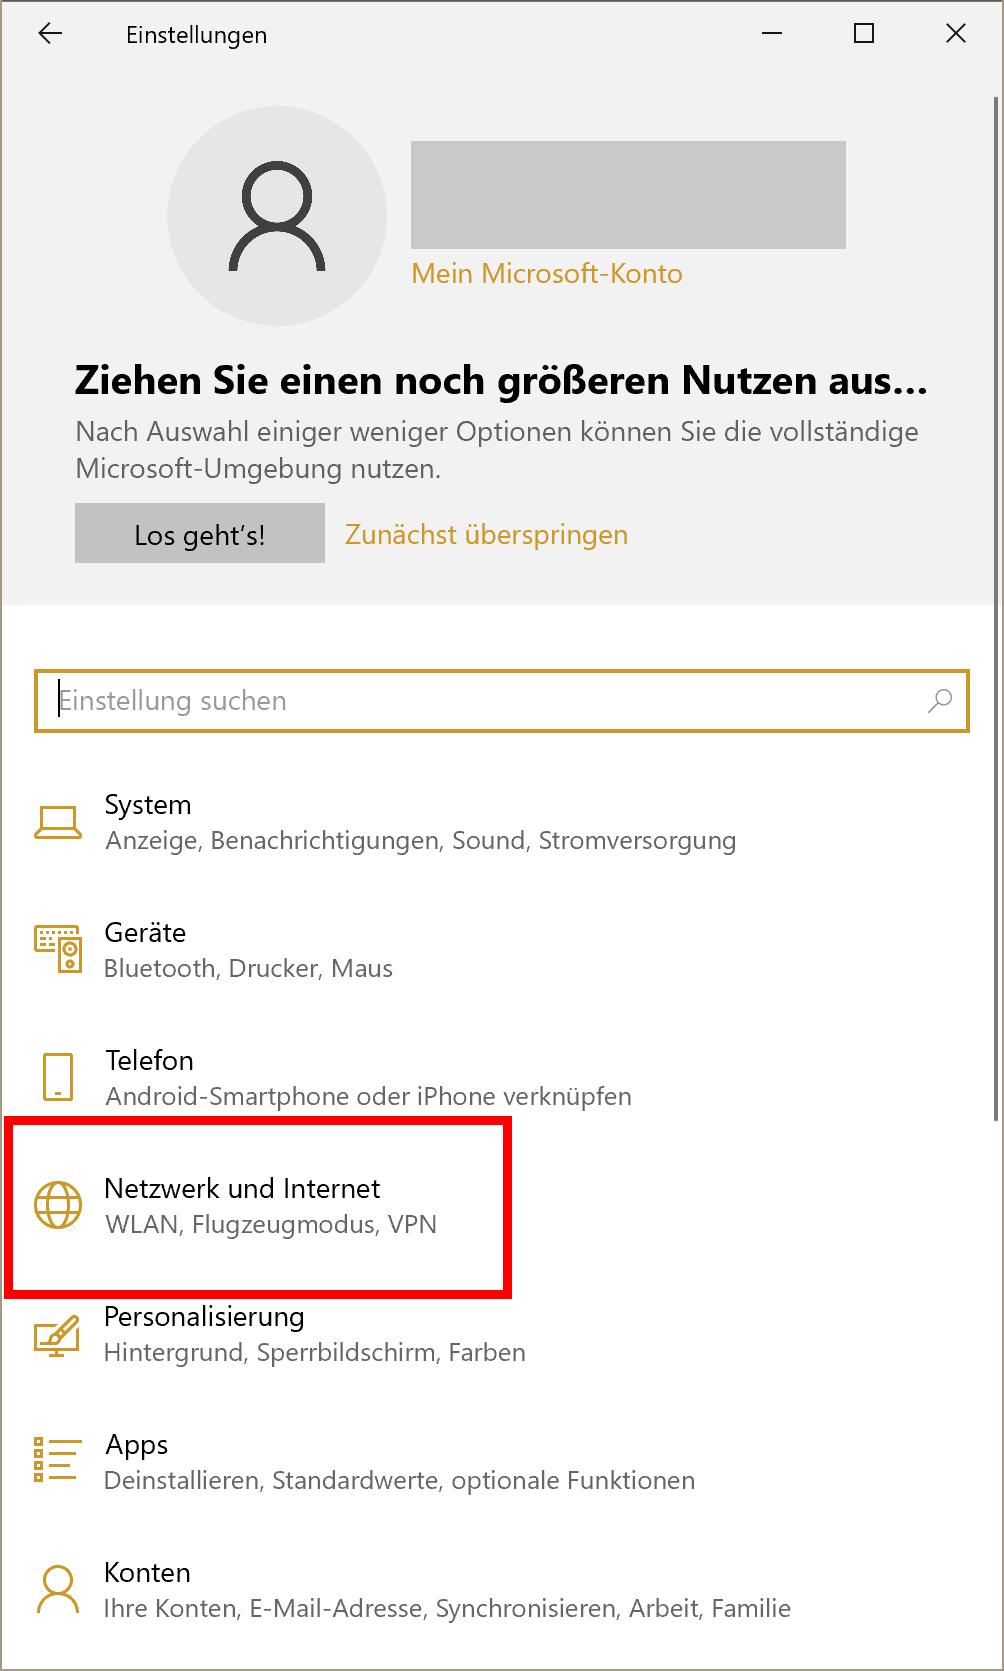
Go to Network and Internet (Netzwerk und Internet) and there to Wi-Fi (WLAN).

Screenshot of a German window with a gray panel on the left side with a search bar and a menu with status, WLAN, DFÜ, VPN, Flight mode, Hotspot and Proxy. The WLAN is framed in a red rectangle. On the white panel on the right, with the title WLAN, a commutator is activated; after, a point with three waves to indicate Wi-Fi and a lock, next to the text eduroam. Under three options in a lime text: show available networks; hardware properties and manage known networks, the last one framed in a red rectangle. Under the "Hotspot 2.0-Network" Options with some text and an active commutator.

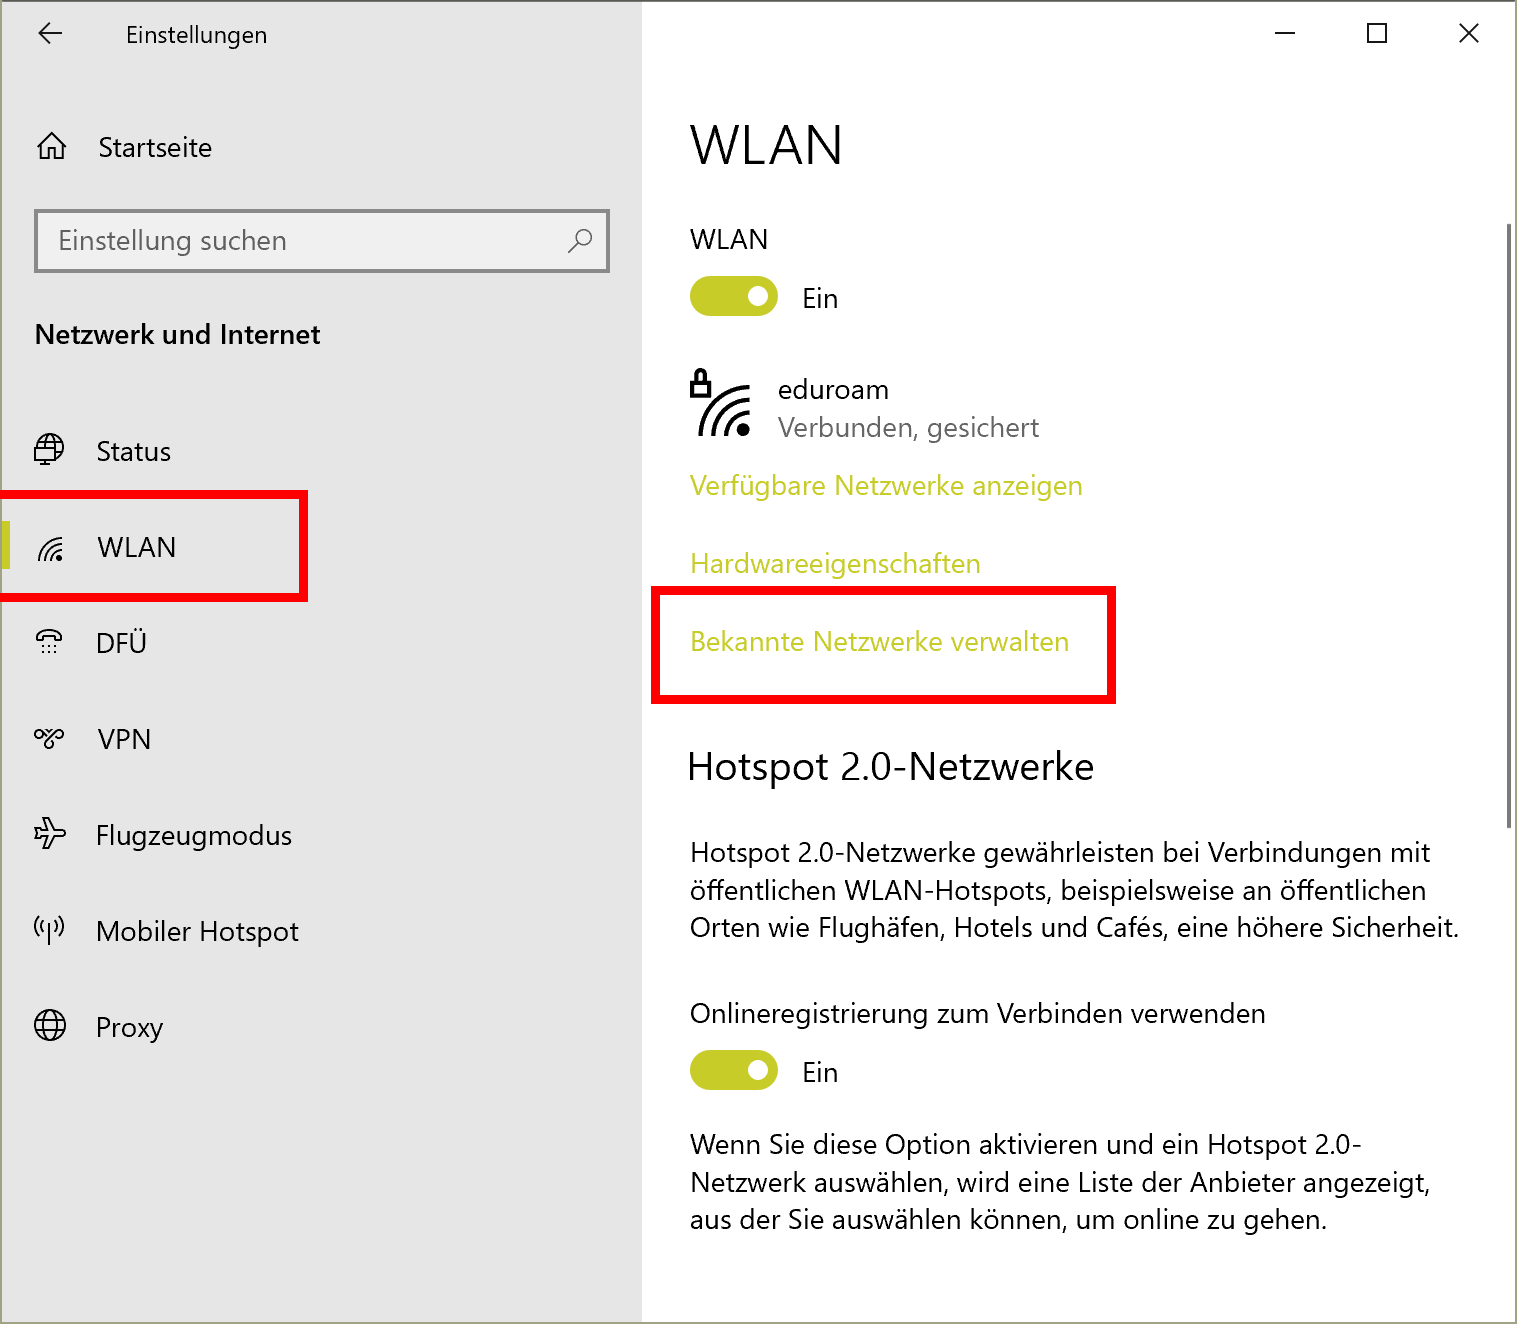
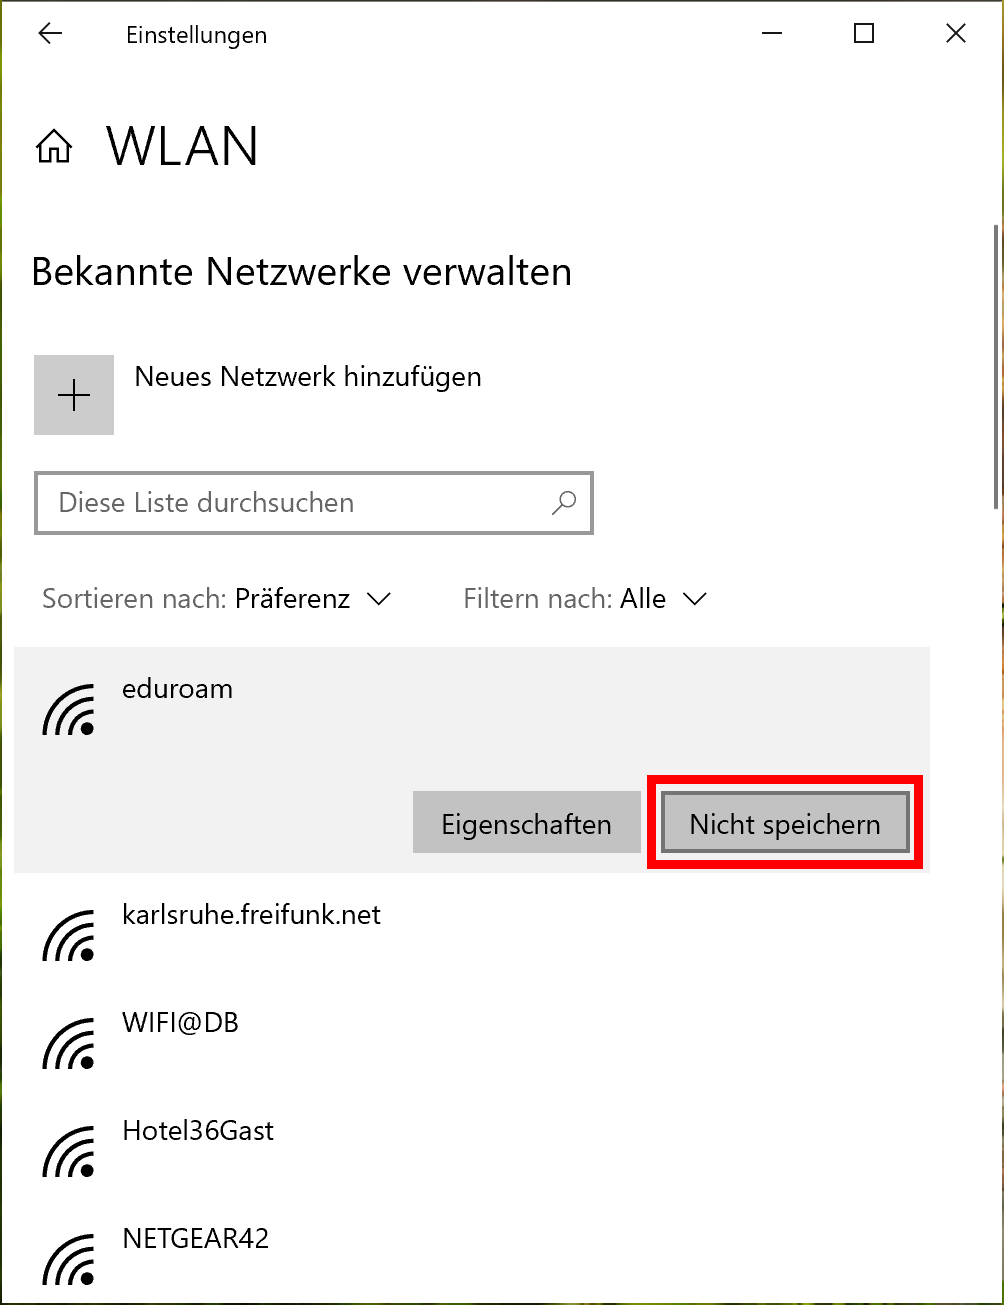
When you click on Managing known networks (Bekannte Netzwerke verwalten) a list of network names will appear. Select eduroam, then the option forget (nicht speichern) will show. Click on forget (nicht speichern) to delete it. Yes, we’re deleting it: Don’t worry, you’ll get it back in a second.

Screenshot of the "Administration of WLAN", in German with a search bar and different networks, represented with a dot and three waves. The first one, eduroam, is selected and framed by a light-gray rectangle, with two buttons: Properties and "Do not save", which is framed in a red rectangle

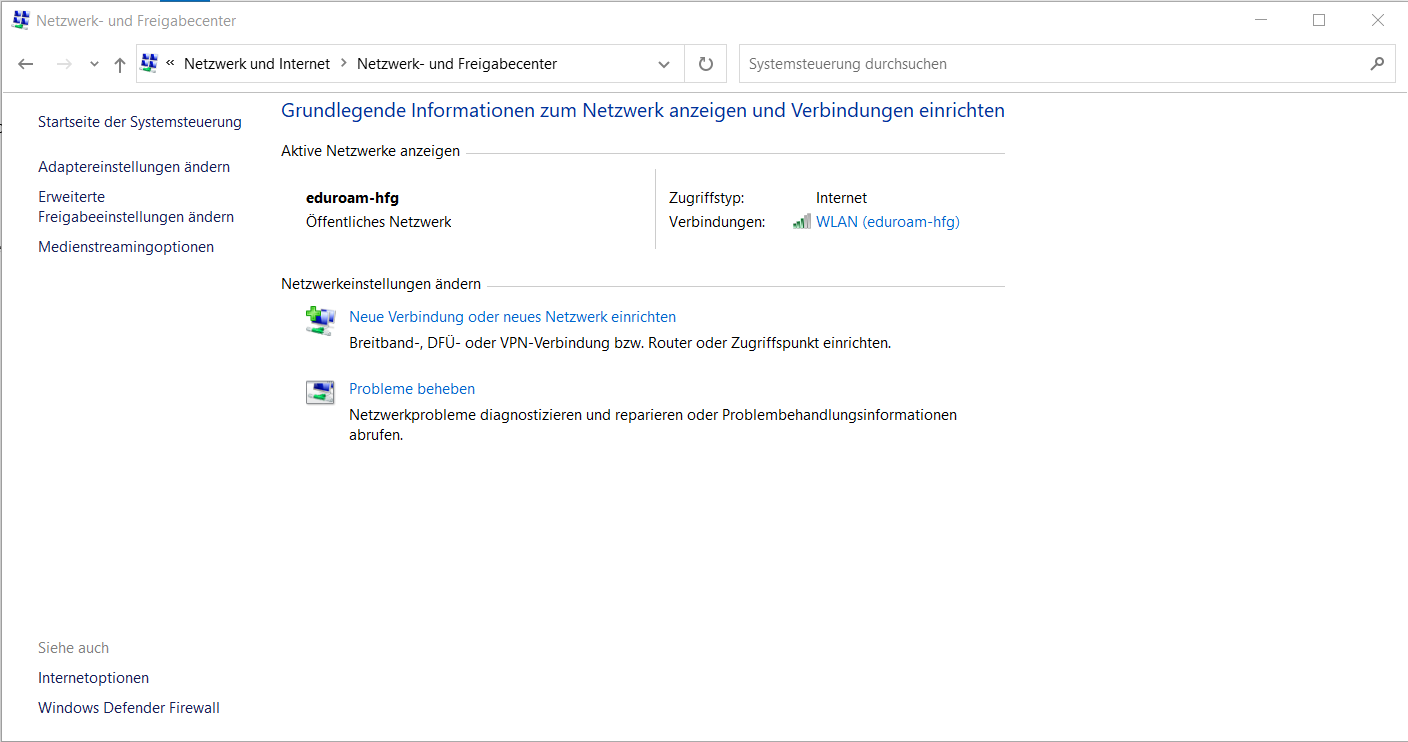
On the Windows Menu (or after pressing the Windows-key), search for Panel Control (Systemsteuerung), and there click on Network and Internet (Netzwerke und Internet). Now you should see something like:

Screenshot of the German "Network and Sharing Center" Windows under the "Network and Internet" section of Control Panel, with an outdated aspect like Windows XP; on the left there is a panel with the options Home, change the adapter settings, change advanced sharing configuration. On the right, the name of eduroam-hfg in bold, near the description access type (internet), followed by "Connection" and four ascending bars, the first two green and repeating "WLAN (eduroam-hfg)". After that a menu with two options: set up a new connection or network, represented with an icon of a screen above a pipeline with a green plus sign, and troubleshoot problems, represented as a window representing zooming in between the pipeline and the screen

Click on “Create new connection or new network” (Neue Verbinung oder neues Netzwerk einrichten). This will appear:

The window for creating a connection or a network, offering the option to choose between four options: an arrow signaling the world globe to establish a connection with internet; An arrow pointing a network computer in a pipe, for creating a new Network. The computer in a pipe, but without an arrow for creating a manual Wi-Fi connection; finally, an icon of a rack to establish a connection with the workspace. At the bottom on the right, two buttons to continue or cancel the process.

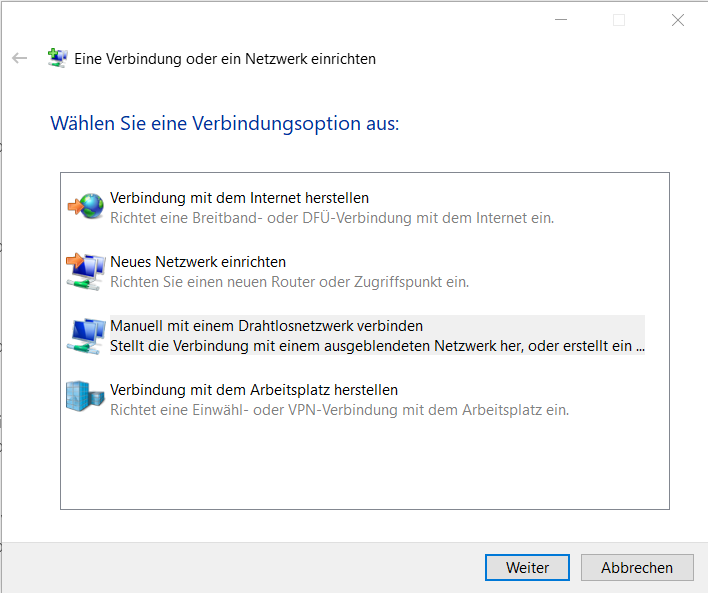
Yes, all the options seems quite similar, but you want the third one (establish manual connection to a wireless network?), and hence we selected it. This will appear:

Screenshot of the settings for adding a wireless connection in German: There is a form with different field: the first one name of the network, is a text-field, and eduroam is written; in the second one, security type, the WPA-2-Enterprise is selected. The third one type of encryption, is gray and AES seems to be an option that can not be changed. On the fourth, Security password: there's nothing written, and next to it a checkbox allows showing the written password. After that, two more checkboxes: the first one, start automatically this connection, is selected; the second one, connect even if the network sens no identification, is NOT selected. Then we encounter a warning, indicating that selecting this option may put the security of the computer at risk. At the bottom of the windows, two buttons to Continue (which is selected with a blue rectangle) and cancel.

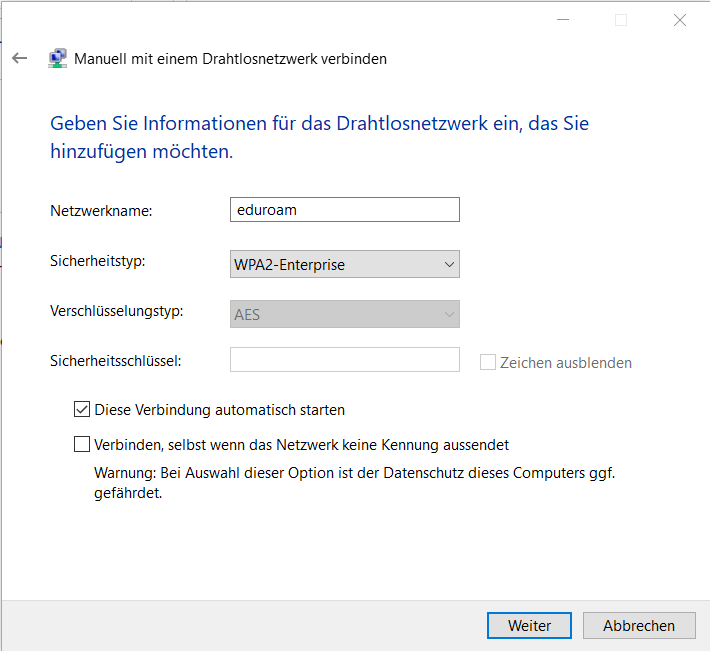
The name should be “eduroam” or “eduroam-hfg” (no matter if you’re using uppercase) and WPA2-Enterprise. Click on next.

Screenshot of the properties of the eduroam-hfg wireless connection, again in German. It has two tabs: Connection, which is selected, and security. After that some information is displayed: name and SSID (both eduroam-hfg), type of network (access point) and availability of the network (all users.) Three checkboxes: connect automatically when the network is in range (selected), connect to a more preferred network if available (not selected) and connect even if the network is not broadcasting this name (SSID), not selected. On the bottom of the window, two buttons: Ok and Cancel.

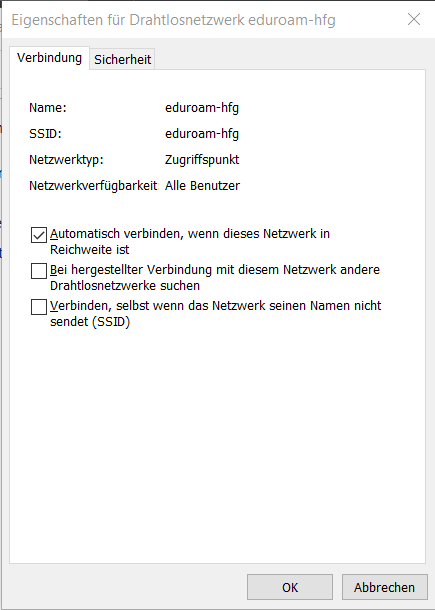
Now the tricky part: You will come back to the Panel control and the first link allows us to change the configuration (or something like that). Yes, it makes no sense, Windows: assuming we started a manual configuration, and you didn’t give any possibility to configure it… Yes, we want to change the configuration you automatically created. After clicking on the link, something like that should appear (don’t worry if your data is different):

Screenshot of the properties of the eduroam-hfg wireless connection, this time with focus on the security tab. Two dropdown fields: Type of security (WPA2-Enterprise) and Type of encryption (AES). After that, a message asks to select a Method for network authentication, again with a drop-down field and the Microsoft: EAP-TTLS is selected. Next to it there is a button for configuration and under it the checkbox is selected, indicating that we want to save the log-in information for every future access of this connection. After that, there is another button for advanced configuration. At the bottom of the window, two buttons for Ok and cancel.

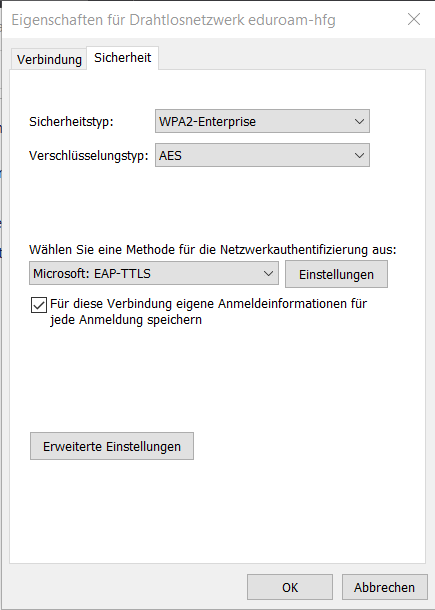
Just ignore it and go to the “Security” tab. We can check the first part from our checklist:

  • WPA2-Enterprise
  • AES

Now select Microsoft: EAP-TTLS from the dropdown menu and then click on Configuration, which looks like:

Screenshot of the TTLS Properties, of course in German: the aspect is even older than before, something like Windows 95 window. Well, it starts with a selected checkbox for activating the identity protection; after that, the text field has "anonymous@hfg-karlsruhe.de" written in it. The frame "Server Certificate Validation" has a text field for "Setting the connection with Server" and the answer is radius.hfg-karlsruhe.de. After that, the trusted Root Certification Authorities is a really long, scrollbar list with checkboxes: "T-TeleSec Global Root Class 2 is selected". After that, but outside the long list, a checkbox Don't prompt the user if unable to authorize the server is selected. That's all for the server certificate validation, but another frame "Client Authentication" is waiting for us. The radius field is selected in "Select non.EAP method for authentication" (and not Select an EAP method for authentication). In the dropdown menu, Unencrypted password (PAP) is selected. After this there is a checkbox, but with this configuration it can not be activated or deactivated. In EAP method for authentication, remember is the one not selected, there is a dropdown menu and a button for properties, but both can not be changed. At the bottom of the window, you probably guess: an Ok and a Cancel button.

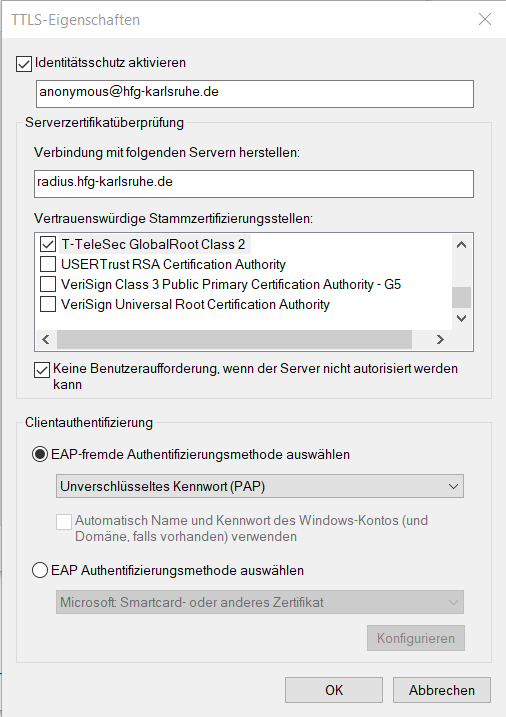
Please check that everything is correct

  • Anonymity protection checkbox is activated
  • Anonymity Identity is anonymous@hfg-karlsruhe.de
  • Connection to server is set to radius.hfg-karlsruhe.de
  • You checked the T-TeleSec Global Root Certificate (you should check in the list)
  • Check also the thing after that
  • Check the EAP-(External?) Authentication method and set to PAP (sometimes this and the next appear to change positions…)

Click on Ok, after the configuration. Small yeah! We still need a couple of things. So, we’re back in the Security tab:

We had previously met this image: Screenshot of the properties of the eduroam-hfg wireless connection, this time with focus on the security tab. Two dropdown fields: Type of security (WPA2-Enterprise) and Type of encryption (AES). After, a message ask to select a Method for network authentication, again with a drop-down field and the Microsoft: EAP-TTLS is selected. Next to it there is a button for configuration and under it the checkbox is selected, indicating that we want to save the log-in information for every future access of this connection. Then there is another button for advanced configuration. At the bottom of the window, two buttons for Ok and Cancel.

and we want to click in Advanced Options:

German Screenshot of the advanced options, with two tabs, 8021x-Settings and 802.11-Settings (the first selected). Frame with a selected checkbox for the authentication mode: with User authentication selected in a drop dropdown menu. After this, a button for saving the Log-in information, and a deactivated checkbox for deleting the log-in information for all users. A second frame, leaded by a checkbox "one-time log-in for this network" is unchecked and everything is deactivated. At the end, two buttons: Ok and cancel.

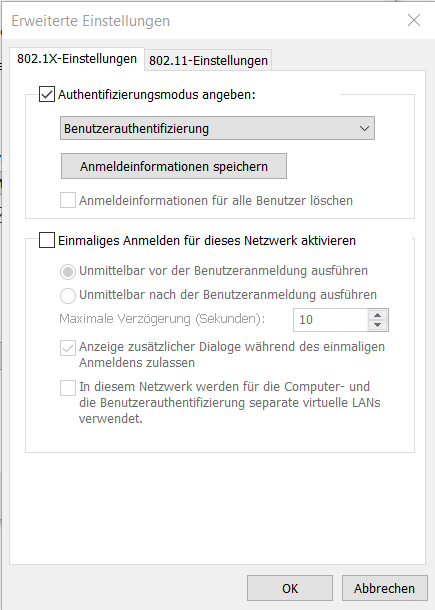
Here, you want to have the first checkbox activated, and select User-Authentication. Then click on the button after it, “Save Log-in information”, this will happen:

A gray window to save the log-in information, this time we're back to Windows 10 aesthetics! Two text-field: the first one for the username and the second one for the password. Then our classical two buttons: Ok and cancel.

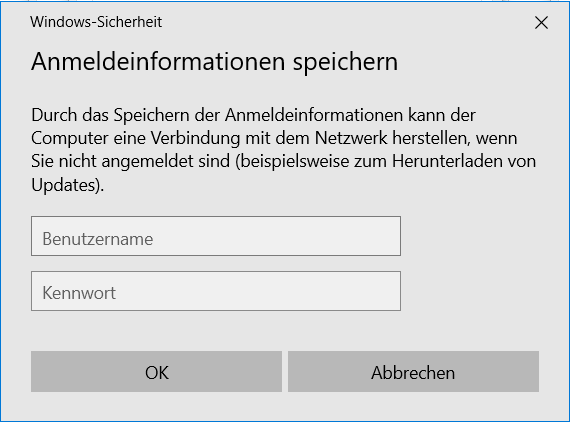
  • Login: your username (everything before @hfg-karlsruhe.de)
  • Password: the E-Mail password.

Click ok. Now you can go to the wireless symbol in the bar and try to connect normally. It may ask you again log-in and password, and then it should work.

So, congratulations, now you have internet (almost) everywhere!
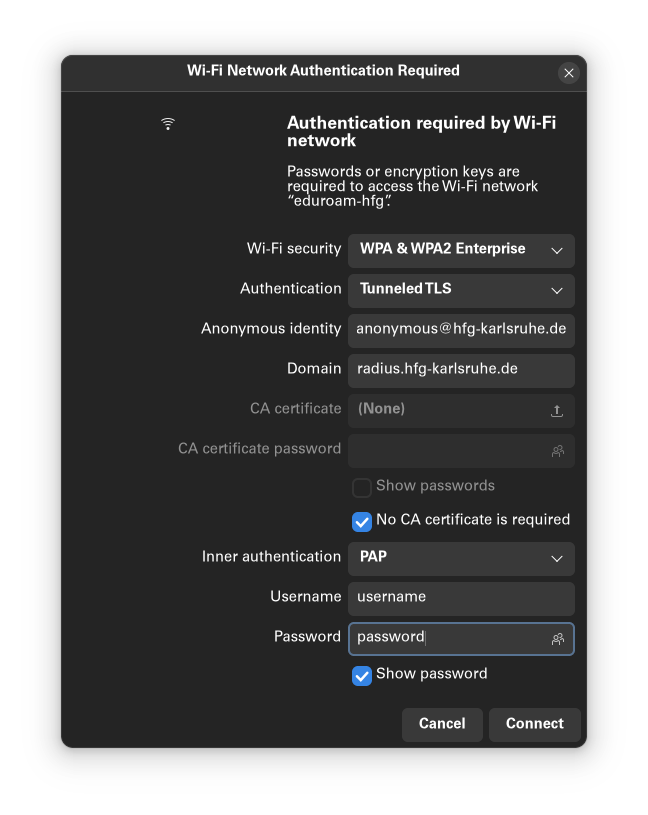
GNU/Linux

Go to the Wi-Fi or Network settings (probably just clicking the Wi-Fi Symbol on the panel, selecting the network and then Wi-Fi settings).

In Security, check these parameters:

Security WPA & WPA2 Enterprise
Authentication Tunneled TLS
Anonymous identity anonymous@hfg-karlsruhe.de
Domain radius.hfg-karlsruhe.de
CA Certificate (None), click on the checkbox No CA certificate is required
Inner authentication PAP
Username your username (without @hfg-karlsruhe.de)
Password your password

Here is how it looks on GNOME:

A black window in English with the title "Wi-Fi Authentication Required". Next to the sign of the point with three waves, a text tells that password or encryption keys are required to access the eduroam-hfg Wi-Fi. After that, a form: Wi-Fi Security is a dropdown menu and WPA & WPA2 Enterprise is selected; Authentication, also a dropdown is Tunneled TLS. Anonymous identity is a text field and "anonymous@hfg-karlsruhe.de" is written; Domain, also a text field, is "radius.hfg-karlsruhe". The next two fields (CA certificate and CA certificate password) are deactivated, as well as the show passwords checkbox. The next checkbox, No CA certificate is required, is selected. The inner authentication, again a dropdown menu is PAP; username and password, both text field, appear with username and password; after that the "Show password" checkbox is activated. At the end of the windows, two buttons: Cancel and Connect.